Pages

Tuesday, July 17, 2012

Challenge Accepted!!

I put myself to the task and it turned out wonderful!!  Again, I took my last challenge seriously and found that it wasn't as hard as it seemed.  I made a card that had no specific purpose...you know what I figured out?!  The card, all of a sudden, has a purpose now.

  This card was made using the Tim Holtz Distress Inks.  (I think I have fallen in love with this technique because of its Bohemian charm!!)  Please go to YouTube and take advantage of the free Tim Holtz tutorials that he offers. They are very educational and inspiring!!  I actually used the alcohol re-inkers to dye the flowers - which turned out wonderfully!!  They are nice and vibrant!!  I also used the Stampers Anonymous 490 set for the saying on this one...it fit well with this card and the challenge. 

I mounted my tag to a piece of Early Espresso, from Stampin' Up!, and made a home-made envelope for it as well.  Don't worry if you've never made an envelope and would like to try it for yourself...this was the first envelope I've made - EVER!! I turned out pretty nicely.

For the envelope, I simply cut a piece of 12 X 12 paper down to twice the size of the card and fold over the sides and tape them down.  I cut a little off the ends to form flaps and tape them down too!  Very easy.

I have one of those people in my life that I think is pretty spectacular and have not quite figured out how to tell her...what better way than to send them a card that is hand made?

Thursday, June 21, 2012

Do We Really Need A Reason?

Today I am posting a card that I made for my Grandpa for his 94th Birthday!! Ninety-four is a lot to celebrate!


 For this card, I used several Stampin' Up!, & Basic Grey products.  I used distress inks to let the image pop and love the effect it gave to the card!!

Its not shown well, but the butterfly image is stamped on vellum to give a soft window... this allows the word image to be seen in the front of the card. 

As shown in the next window, word stamps are very elegant if they are placed well.

Grandpa was sleeping when I set it on his table, but knowing him I know he very much enjoyed having received this card.  He is a very down to earth person who appreciates the time and energy it takes to give and received such a thoughtful gift as a homemade card.


My question today is Do we really need a reason to make a card?  Do you?

I know that I have always had a reason to make a card whether its intended to give right away or if its something premade to send for such an occassion later...my challenge is to push myself to make a card for no reason...I am working on such a card right now and I will say it has been difficult to put together...I will share this card when its finished!!  Will you be able to make a card for no other reason than to put one out there and have til you need it - for whatever reason?  Should we have a cache for such things?  I'm interested in your thoughts, so let me know what you think!!

As always, any and all comments are welcome!

Thanks for looking and happy stamping!!

Stay Inspired!

Roseanne

supplies:
Cardstock:  SU! Brocade blue, Regal Rose, Whisper white
Designer paper:  euphoria paper pad from BasicGrey
Ribbon:  Stampin' Up!
accessories:  vellum
ink: stazon Jet Black, Memento Tuxedo Black, Archivers coffee, Stamp-a-ma-jig, SU!
Techniques:  distress

Sunday, April 29, 2012

Magazine Inspiration Make-Over!!

I picked up the most recent issue of CardMaker, featuring a front cover photo and article by Tim Holtz. I was taken by the beautiful technique of the card on th front - typical beauty created by Tim Holtz!! His card inspired me to pull out my Distress Inks from Ranger and create, what I originally thought of as a beautiful card.


The distress technique, learned from Wendy Veach from 
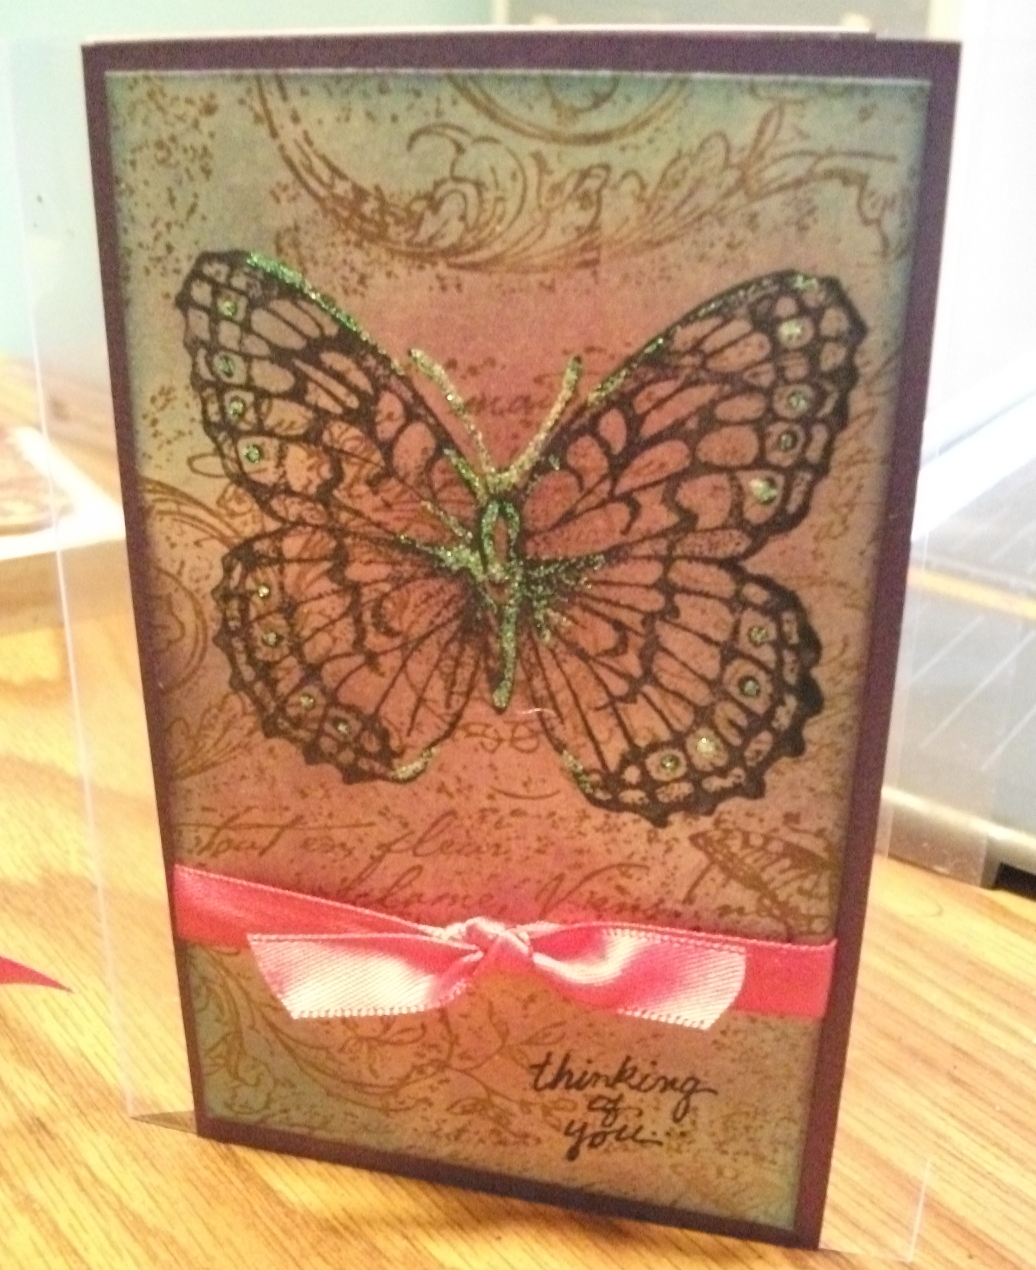
Stampers Anonymous 490, was nice with the additional pop of the color from the ribbon, but from second glance, it appears to be too plain.

I know I have this problem all the time, which is why I don't post as much as I like - and knowing that I am my own worst critic, I couldn't bring myself to post this card until I improve the color, or background, or the over all appearance of the card.

Happy to say I did just that!!  After taking a second look at the card - which I had intended to send my mother for mother's day, I KNEW I could do better!

So my second card was that much better!

I used the same elements on this card...just enhanced its appearance with more color, gave a pop to the background and accentuated the color better!!

The second card is attached to acetate, because I couldn't decide what to put it on AND I didn't want to take away from the stamped background of the the card.

Happily I will send this card to MOM for mother's day - and although she'll say "you didn't have to do that," I know she will be proud to have received such a well thought out card!!

I hope everyone's been thinking of the card they want to send their MOM for Mother's Day, and I hope all of your cards are as well received as they want them to be!

Stay inspired and keep creating!

Roseanne

supplies:
Stamps:  Stampin' Up Stampin' Around Jumbo Wheel Very Vintage, SU! Stipple Butterfly, Stampendous Thinking of You...
Paper:  the PaperCut Violette Curious Metallic, Art Gone Wild Acetate Sheets
Ink:  Memento Tuxedo Black, Archival Ink Coffee, Tim Holtz Ranger Distress Ink dusty concord, worn lipstick, broken china
Accessories:  Generic Hot pink ribbon, Crystal Stickles


Thursday, April 19, 2012

As promised!

As promised, the third of 3 scrapbook layouts!

Scrapbooking with a purpose is essential in getting the job done!  I am glad I bought these three frames...if for no other reason than to keep me going!!

This layout features the t-ball talents of my oldest.  It, of course features his natural swinging ability and base running.  Whether they are pros or still learning, nothing brings a bigger smile to a childs face than a layout that features him or her doing something they're proud of!!

This layout was extremely simple.  I used a paper pack from Close to My Heart - this gave me the ability to have ready matched paper.  I made the base balls by punching circles and adding the faux stitching with marker.  I distressed the balls and the title to age the look a little and to help pop-up the balls...which were adhered with foam tape.  Just a small touch of journaling and an 'All Star' rub on and done!! 

This layout shows how simple photos and embellishments go a long way!!

Thanks for looking!

stay inspired!

Roseanne


Monday, April 16, 2012

To continue with my previous post...and to include all three kids in the fun, I have finished the second of 3 framed scrapbook pages!  This page is especially adorable because it truely captures the fun & sillyness of my middle child.

On this layout, I incorporate a pull tab for journaling.  I like to do this every once in a while because I think that journaling can sometimes detract from the intended focus of the page...in this case the focus is on his adorable little face.


I started with a solid blue background, added 11 X 12 stripe accent, then the polka dots, stars and more stripes - all designer papers are from Bo-Bunny Shabby Princess Collection, with solid red tucked in here & there.  I outlined his name and age with a frame cut using a Quickkutz folder from long ago...I had that sitting in a box- I couldn't throw it away. The buttons -generic, and star clip- making memories, cheeky flat clips, made nice accents to the page and the "so fun" was cut from white card stock, using my cricut and distressed with denim ink from Close to My Heart.  The tag for the journaling card (tucked under the picture) was punched using Stampin' Up! punches.

It seems as though a lot of time and energy went into this page, but actually, it wasn't that difficult - especially considering the subject! :)

I will post the third and final layout soon!  I hope this helps to get you motivated to pull out those pics and get them started.  I felt that this was my way of at least getting to scrap current photos - even though I am notoriously behind on my scrapbooking!

Thanks for looking!!

stay inspired!

Roseanne

Sunday, January 29, 2012

Recycling Scraps...

As a working mom, I find it hard to fit it all in as regularly as I want to...for some unknown reason I feel tremendous guilt if I take time for myself when the dishes aren't done, and the laundry is piled up.  This weekend the 'nesting' bug hit me and I got all my chores done and finally felt comfortable going to my craft space and enjoyed every minute of it!

A couple of years ago I went to CK in Des Moines and took a few classes...mostly on scrapping in a minute or on a budget - I don't know about you but my husband always grumbles when I spend more than $20 at Michaels, which I do everytime I go there, so I love it when I can use my supplies on more than one project.  Anyway, one of the classes I took at this convention involved a Creating Keepsakes album in an hour and I came home with extra supplies that I tucked in my paper supplies and forgot about...until today...

I made this layout in less than 20 minutes using those left over supplies and I cannot get over how well it turned out!!  The journaling will be added but I wanted to show & tell!  The frame is one that I bought about a year ago through my friendly Creating Memories demonstrator on discount, because they were on sale - I also bought one for each of the boys in chocolate.  Once I am done with their layouts I will show & tell those too!!

The papers and accents were all part of the album class and absolutely love how this turned out! 

If your afraid of having a one page layout because your scrapbook will not be 'even,' try one anyway...I used to be that way too but got over it quickly when I realized how fast and fun the one page layout can be.  I also gave up on trying to create a matching page for the Got Sketch classes I have taken!  Its alot more work when you have to have those 2 page layouts.

Thanks for looking and happy crafting!